4.03.2020

# 11 PAPIER MACHÉ FINGER PUPPETS


#11 Final project a tried and true f a v o r i t e
Project: PAPIER MACHÉ FINGER PUPPETS

Materials: 3/4 c flour, warm water, newspaper strips, paint,
brushes, glue, masking tape, empty toilet paper tube, knick knacks
Directions: Put flour in wide bowl and slowly add enough warm water to make the consistency of cream of wheat. Mix
with your hands until all the lumps are gone.
Cut or rip 1" x 6" strips of newspaper (about 10 or as needed) Crumple up newspaper into ball shape for the
head and tape, then tape the head to toilet paper tube
keeping the inside of the tube free of newspaper. Cut off 1-2" of the toilet paper tube. You want just enough to get your fingers inside so you can work the puppet. (See photo below) Dip each strip in the flour mixture and remove excess with your fingers. Wrap onto head form and smooth
out each piece. Cover your form with 2 coats of
strips( this includes head and toilet paper tube. (body) Let dry.
Paint the form white. Let dry.
Paint a face and some fun patterns on the body
and glue on some yarn for the hair or anything you
think would help define the character of the puppet.
Make another one so your puppet has a friend!
Tips: The amount of flour really depends on how many puppets and what size you are making.
You can make a puppet theatre out of a cardboard
box and paper towels for curtains..
Glue some paper or paint on the background of your
cardboard theatre.
HAVE A FUN PUPPET SHOW FOR THE FAMILY!
I do hope you have enjoyed making some of these art
projects while you are quarantined at home. I would
love to see your creations, please send photos to me-
susanjeanriegel@gmail.com


# 10 DOUGH PLAY


#9 "Do, Re, Mi Fa, So" - Series of art projects for kids
Project: DOUGH PLAY

Materials: flour, salt, oil, water, cream of tartar
Directions: photo 2. Pour everything into a cast iron
skillet or heavy pan. 3-4. Put on low heat and start stirring until it forms a ball, spread out in pan with spoon to let
water evaporate, photo 5. then turn out on plate to let cool.
You can use it like this or divide it up and add color..
Roll pieces of dough to make skinny rolls, pinch
small balls and roll on your table to make various
size balls. Get crazy with it 
Tips: young kids- you will need an adults help to make
the dough! Keep in plastic container, will last at least
5 days. Have fun creating whatever strikes your
fancy


# 9 MAGIC FAIRY WAND


# 9 DO YOU BELIEVE IN MAGIC? art projects for fun!
Project: MAGIC FAIRY WAND

Materials: Stick, glue, yarn, ribbon, thread, string, beads, trinkets, sparkly bling bling
Directions: Go outside and find a stick that has some
character that speaks to you..also get a few twigs.
Find a good side that will be your handle..photo 2. Take the
smaller twigs and wrap thread or string around both
the main stick and smaller twig attaching together.
Maybe attach 3-4 smaller twigs. You can put a dab of glue on the string to hold it.
photo 4. Begin by tieing a knot at the bottom to create your handle with yarn. Wind it around the stick. You can add another color by tieing two pieces of yarn together. Continue wrapping the yarn, (ribbon, string) until you have
covered as much of the stick as you want. If you need to
dab more glue on any areas, do it as you go, it will dry
clear. Add strands of beads or trinkets by tieing them on
parts of the stick..
The last step is adding anything sparkly. I used a gold trim I had but you can use something similar or glitter or whatever you have that is bling bling.
Tips: This is a personal Magic Fairy Wand and while you
are making it you can wish for whatever you want for
yourself or others..HAVE FUN!


# 8 POTATO PRINTS for everyone

#8 Series of simple art projects ~ enjoy
Project: POTATO PRINTS for everyone
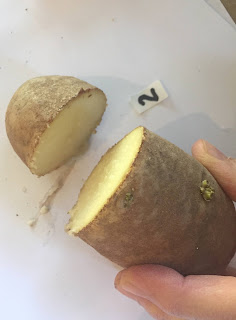
Materials: photo 1. potato, safe knife (used for pumpkin carving) black paint, brush, paper
Directions: 2 & 3. Cut potato in half and then cut into shape you desire. 5. Take brush and paint the raw potato not the skin. 6. Hold potato so you can easily press down on paper.
Voila! You did it..keep printing the same image it will
get lighter and lighter or apply more paint..its your
call
Tips: You can use any color but I like black. You can also use muslin or cotton t-shirts to print on.
You can cut any shape and make into an image. If you're feeling adventurous cut inside the shape for more detail!
Have fun!!!!


4.02.2020

# 7 COLLAGRAPHS FOR YOUNG AND OLD

#7 Series of tried & true simple art projects
Project: COLLAGRAPHS for young and old ~ very fun and
easy, just follow along
Materials: paperboard, glue, brushes, black and white acrylic paint, paper, odds and ends from your house
Directions: I am showing two examples in the photos
for this project
l. Draw some shapes (house, cat, moon, tree) on a board a little thicker then paper and cut them out. Then glue them onto paperboard however you like.
Give the paperboard a coat of white paint.
Let this dry. This seals it.
Paint over the board with black paint, you only have to
paint the parts that you glued on (you will see why)
Its best to work quickly here so paint doesn't dry
Place paper over painted board and press firmly with
your hands to print the paper
Voila! You have your collagraph!
2. For the other one I used various fabrics and fun things I had..elastic,lace, textural fabric, cut paper, thread, rubber bands, string, yarn and more
Try things you already have. Make sure you glue them down well and let glue dry.
Tips: You can make several prints from one board..just
make sure you have the right amount of paint so it
doesnt stick to board..